Introduction:
The JPG (or JPEG) format remains the universally accepted standard for photographs and complex images, thanks to its excellent balance of file size reduction and acceptable visual quality. If you have an image in a different format—such as PNG, HEIC, or GIF—and need to quickly change it to JPG for easier sharing, uploading, or to save disk space, an online converter is your fastest route. This guide provides a simple, six-step process to instantly convert your files, ensuring high search engine visibility and a smooth user experience.
Why Choose JPG? (A Quick SEO Note):
JPG is preferred for web performance because its compressed nature allows images to load much faster than uncompressed formats, which is a crucial factor for Google’s Page Speed ranking signals.
6 Steps to Convert Your Image File to JPG Instantly
You don’t need expensive software or technical expertise. We’ll use a straightforward online tool to transform your image into the widely compatible JPG format in moments.
Step 1: Access the Conversion Tool
Start by navigating directly to a dedicated and reliable online image converter platform. Visit the designated URL, such as https://imageconverte.com/ (or your preferred high-speed service). This ensures you land on the correct interface designed for quick format switching.
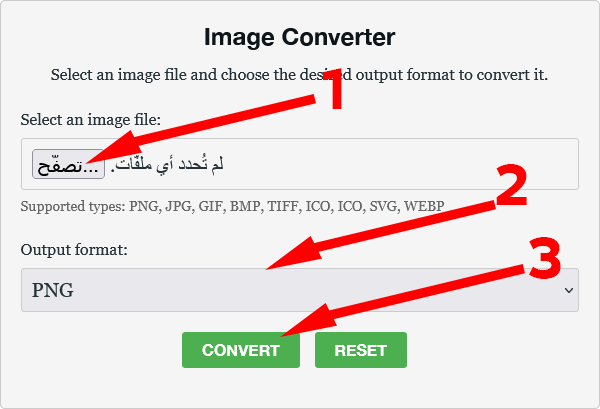
Step 2: Initiate File Upload
Once the website is fully loaded, look for and click the primary upload button, typically labeled “Choose File” or “Upload Image.” This action will open your system’s file browser, allowing you to select the image you wish to convert.
Step 3: Locate and Select the Source Image
Browse your folders and select the specific picture or graphic that is currently in a non-JPG format (e.g., a PNG, TIFF, or BMP file). After selecting the file, the tool will quickly upload and prepare it for the conversion process.
Step 4: Define the Target Format
This is the most critical step. Find the option or dropdown menu labeled “Output format” or “Convert To.” From the available list, ensure you explicitly choose the JPG format. This setting tells the converter precisely what the final file type should be.
Step 5: Execute the Conversion Command
With the image loaded and the JPG format selected, simply click the “Convert” button. The online service will immediately begin processing the file. The conversion usually takes just seconds, contingent upon the original file’s size and your internet connection.
Step 6: Download Your Final JPG File
Once the conversion is successfully completed, a new prompt or button will appear on the screen. Look for the label “Download Converted Image” and click it. Your newly optimized, ready-to-use JPG file will be saved directly to your device.
Leave a Reply