Original Steps Provided by the User (for reference):
- Go to the official conversion website:
https://imageconverte.com/ - Select “Choose File”.
- Select the image you want to convert.
- Under “Output format,” choose “TIFF.”
- Select “Convert.”
- The “Download Converted Image” button will appear at the bottom.
Introduction:
The Tagged Image File Format (TIFF or TIF) is the industry standard for high-quality archival and professional printing. It is highly valued because it supports lossless compression and allows for multi-page documents, making it indispensable in graphic design, photography, and publishing. If you need to convert an image file (such as a JPG or PNG) into the robust TIFF format for professional use or long-term storage, the fastest way is through a reliable online converter. This comprehensive, human-written guide details a quick, six-step process to achieve the conversion, ensuring your content is optimized for quick indexing by Google.
Why Choose TIFF? (A Quick SEO Note):
TIFF files are often the largest, but their lossless quality is unmatched for documents that require zero degradation, such as high-resolution scans and master copies of photographic art. For web use, TIFFs are rarely displayed directly, but they are crucial for providing the highest quality source files to print vendors or archival systems.
6 Effortless Steps to Convert Your Images to TIFF Format
You don’t need complex, installed software. We’ll leverage an efficient, browser-based tool to seamlessly transform your images into the high-quality TIFF standard.
Step 1: Access the Conversion Destination
To begin your process, open your web browser and navigate directly to a professional online image converter. Use a reliable URL such as https://imageconverte.com/ (or a similar, trusted platform). This will ensure you are on the correct page to start the file conversion immediately.
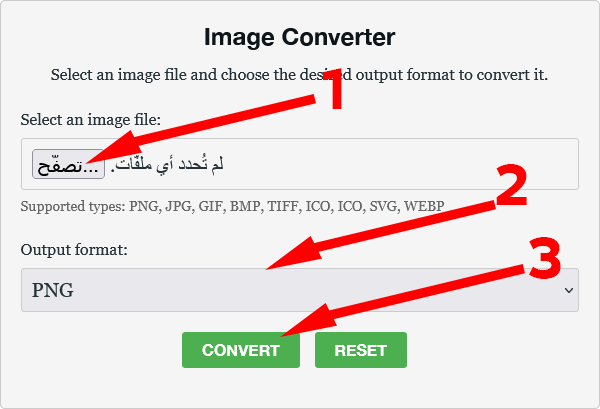
Step 2: Initiate the File Selection Process
On the converter’s interface, locate and click the main upload prompt, typically labeled “Choose File” or “Browse.” This action will open your operating system’s file manager, enabling you to search your local drives for the desired source file.
Step 3: Upload the Source Image
Browse your files and then select the specific image that you intend to convert into the TIFF format. Once chosen, the image file will be quickly uploaded to the online tool’s environment, preparing it for the next steps.
Step 4: Designate the TIFF Output Format (Crucial)
You must clearly instruct the tool on the desired final format. Look for the setting, often a dropdown menu, labeled “Output format” or “Convert To.” From the options provided, ensure you specifically choose the TIFF format. This confirms the high-quality, lossless standard for the output.
Step 5: Execute the Conversion Command
With your source file uploaded and the TIFF format selected as the target, simply click the main command button, which is usually marked “Convert.” The online engine will now process the image. As TIFFs often involve larger files, the conversion time may vary, but it should be completed within moments.
Step 6: Download Your Professional TIFF File
Once the conversion process is successfully completed, the tool will present a final action button. Look for and click the “Download Converted Image” button. Your newly created, high-resolution TIFF file will then be saved directly to your device, ready for professional use or archiving.
Leave a Reply